Sunday, August 16, 2009

SATA, RAID & BIOS

On 10 August, 2009, my computer wouldn't boot up.

The RAID BIOS information failed to post, which led me to believe that the RAID setup had broken.

The Error message that appeared was to the effect that "No boot drives were recognized." In other words, the computer was not recognizing my two SATA hard drives.

After doing some reading online in one of my Linux computers, I came to find out that Windows XP doesn't recognize SATA drives unless they are set up in a RAID configuration.

So I went into the normal BIOS and made a change.

The diagrams below were copied from my pdf BIOS manual.

In the BIOS (hit the DEL key at the first beep after starting the computer) I entered into "Integrated Peripherals."
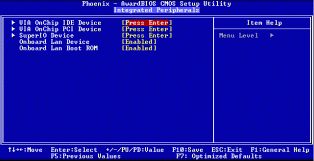


Then I hit the Enter key at the spot highlighted in red above, which got me into the next screen, shown below.
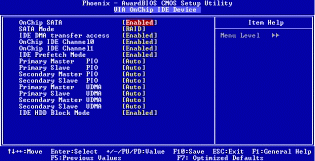


The second entry on the list is SATA Mode.

I hit the Enter key on [RAID] and changed that option to [IDE]. I then saved the changes and exited BIOS and the computer started up.

I no longer have a RAID setup but that's fine with me because it never worked right in the first place.

Note: The BIOS manual mentioned above says the following:

OnChip SATA
This option allows you to enable the onchip Serial ATA.
The Choices: Enabled (default), Disabled.
SATA Mode
The Choices: RAID (default).
That last line is incorrect. It should say:
The Choices: RAID (default), IDE.

The reason for changing that setting to [IDE] is so Windows can recognize SATA drives when they're not set up in a RAID configuration.

Saturday, April 25, 2009

Outdoor shower with attitude and learning curve

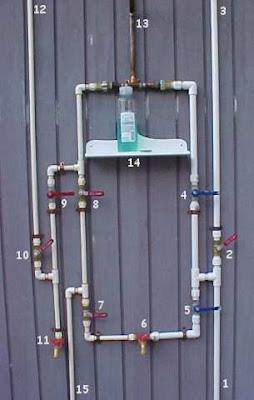
This is a combination outdoor shower.

Solar hot water from a hose on the roof.

Or water from the hot water heater.


Water heated by the sun in a hose on the roof
feeds the hot side of the system from the top.

Or, city water from our water heater feeds the
hot side from the bottom on the left.

The shower 'floor' is a concrete & tile table top
we found while curbside shopping.


Hose is mounted on a sheet metal platform, clamped
down by 2 X 2 wood strips.


A total of 9 quarter-turn ball valves
were used to construct this project.


1. PVC city water supply (cold)

2. Shut-off valve for water running
to hose on roof.

3. PVC connects to hose inlet on roof.

4. Valve controls flow of cold water
to shower head.

5. Valve controls flow of cold water
to hose bibb.
(see #6)

6. Hose bibb for city water
(hot and cold).

7. Valve controls flow of hot water
from water heater to hose bibb.

8. Valve controls flow of hot water
from water heater to shower head.

9. Valve controls flow of solar hot water
from hose on roof to shower head.

Note: When taking a shower, you either use
valve #8 or #9 for the hot water supply,
depending on whether or not the solar water
is hot enough.

10. Shut-off valve for water running
from hose on roof.

11. Hose bibb for solar hot water only.

12. CPVC connects to hose outlet on roof.

13. 1/2 inch copper pipe connects hot and cold
water to shower head.

14. PVC shelf for soap and shampoo.
We made this by cutting out a section
of a scrapped PVC fence post.

15. CPVC city water supply
(from hot water heater).

Wednesday, April 22, 2009

PVC lattice & pipe driveway gate

Here is a driveway gate we made using PVC lattice, PVC pipe, some scrap aluminum, a tire iron, a locking latch from Home Depot, some cable and turnbuckles and a bag of concrete which we used to make a block for the center post to rest on when the gate is closed. The gate is about 6 feet high and spans a distance of about 11 1/2 feet.


Closed gate as seen when entering driveway.


Gate in halfway open position.
Center post is made from a scrapped PVC fence post
which I found while 'junking'.


Backside of gate showing construction details.

We used gray PVC (normally used for electrical work)

The PVC lattice is screwed to the PVC pipe using
short self-tapping sheet metal screws.

The tire iron is at the bottom center and keeps
the center gate post stationary on it's support block.


Diagonal cables, attached with eye bolts and
turnbuckles keep both halves of gate from
sagging.

Tire iron is mounted into section of pipe which
is bolted to gate post. It easily slides up and
latches into a large screw eye, seen just above
tire iron.


Support block, seen at bottom of gate post
was made by casting concrete in a wooden box.
A piece of aluminum channel was cast into the
concrete to keep the tire iron in place when in
the down position.


A section was cut out and pieces of PVC
from the post were used to form a small
enclosure for the latch. PVC glue and small
screws and bolts were used to construct
the enclosure.


A length of square tubular aluminum is used as
a brace to keep the center post stable on windy
days. The brace is hinged to the fence on the left
and passes through a short piece of PVC pipe on
the right. The brace attaches to the post with an
arrangement of 3 aligned screw eyes and a short
bolt that drops down into the aligned screw eyes.

The short piece of PVC pipe allows the brace to
slide open along with that half of the gate. This
allows the gate to be opened without having
to hold the brace.


Aluminum extrusion which is normally
used for screen enclosures is used here
to re-enforce the hinge sides of the gate.

The two halves of the extrusion are bolted
around the PVC pipe and then the hinges
are bolted through the aluminum.

Notice the white T-fitting. This is a normal
PVC fitting. They don't make a gray PVC
fitting like this so a normal PVC fitting had
to be used here.

To 'monetize' or not to 'monetize'

The real questions are:

1) How much money can actually be made by 'monetizing' a blog?

2) Is it worth gunking up your blog with a bunch of distracting billboards?

I personally don't like to see a bunch of distracting adverti$ing plastered all over the place.

So for me, there would have to be a lot of money in it before I'd be willing to allow the adverti$ers to hijack my blog.